Saturday, May 28, 2016

DIY: Leather Jacket to Suspender Skirt

20160528_165024[1]  

Hey friends, totally glossing over the fact that I've been mostly absent for around a year. No excuses, let's just hug like old friends (the good type that doesn't hide behind shampoo bottles at the grocery store instead of speak to each other) the type that actually want to 'do lunch' and then really call each other to make plans. Let's be those friends xoxo


So I'm always crafty #youknowdis and, yes I'll admit to being a supplies hoarder, and by supplies I mean erm anything that could be made into anything, so yep my craft room is pretty hazardous to walk through. Bags of hopeful fabric here, well meaning piles of future awesomeness there, seriously people my craft room is like Mary Poppins bag x Dr Who's Tardis.  One day I will fall and meet my end, buried by a pile of old jeans or Upholstery samples, my friends will say with teary eyes, it's how she would have wanted to go.


20160201_092517[1]

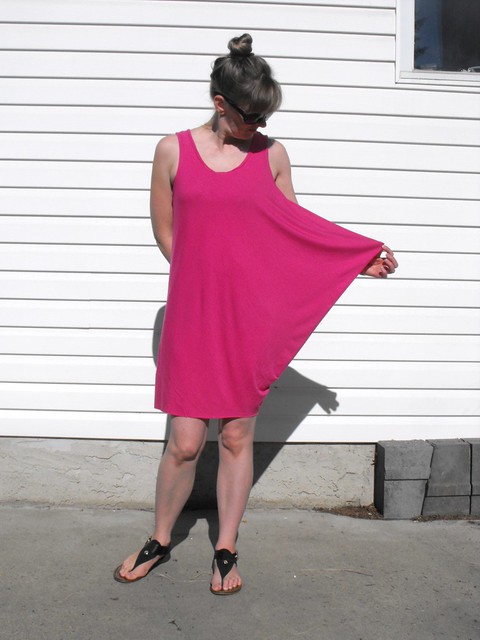
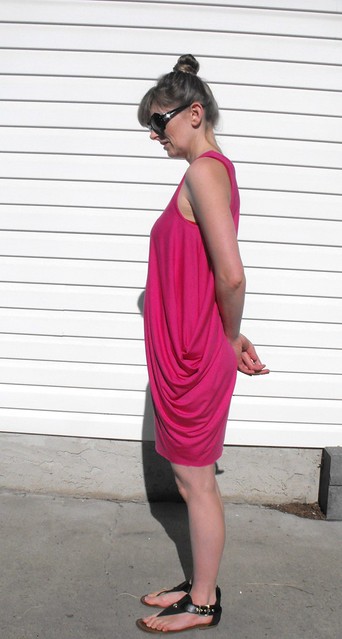
In a bid to tackle supply mountains, I promised myself that if I couldn't find something amazing to do with a pile of 70's Leather trench coats then I would have to (GASP) send them on to a new home via Salvation Army. Only when I had given myself such an ultimatum did those creative cogs start whirring and the Suspender Skirt (Braces skirt back home in England?) was born.


I was totally inspired by the Leather Pinafore dresses all over Pinterest and originally that was the plan until I remembered that A, I am not Miroslava Duma and B, Leather Boobage is way too cool and sexy to be worn to wash my dishes or pick up the kids. So leather bottom half it is!


I even managed to keep the original pockets and buttons although I had to change the placement. Can you see where the skirt starts on the original Jacket? Yup it's the waist seam, then I just hoisted that bad boy up, took it in and fashioned the straps from the belt that came with. Since that only covered one strap I used the Leather jacket facing for the other side. I crossed them at the back and that was it.


20160528_164851[1]

So what do you guys think? 

What would you have made out of that Mans Leather trench?


Thursday, June 25, 2015

Reupholstery - Transformers, Robots in Disguise!

Upholstery,  after pic, Transformers

Once upon a time there was a reading chair, it was old and the fabric was scratchy but it rocked many babies to sleep, Once those babies grew up and fell asleep on their own (sometimes even all night) the chair was left in the dark creepy part of the basement we lovingly refer to as La Dungeon.

There it was forgotten, and our pesky cats used it as a scratching post ggggrrrrrrr, those long ago stories and cuddles in the chair were but a distant memory.
 
Before pic, Needs an update

That poor sad chair sat and sulked for a while, until its owner had something very important to do, and really needed something meaty to dive into and get her procrastination on. She had a deadline to meet, a ton of alterations work, and a blog that had started to heal over it had been that long since she logged on. So of course one day she started ripping, and pulling the chair to pieces until it was quite nude and embarrassed.

That same owner had no idea what to dress the chair in, or even where it would live, until this crazy Transformers fabric jumped off the bargain wall (can you believe this was $2.50 a metre?) begging to be fixed up with a lonely chair that didn't get out much.
Transformers Chair, Upholstery,  After

To cut a long story short, they fell in love, invited some Denim and Red Vinyl over to party and lived happily ever after <3

This cutey patootie chair now lives in my sons big boy Superhero bedroom in the exact same spot it did when it used to rock him to sleep over a story or 5 which makes me a happy Mama.

Sunday, March 22, 2015

Remember me?


Helllloooooo to all my lovely readers(dusty echo resonates), it's been 6 months, a camera breakdown and some ongoing house renos but I'm still alive and kicking.

Sometimes I'll admit, I've sneaked past my dusty laptop with a fake moustache and glasses on to give you the slip but I always knew I'd end up back here, giving you some lame apology, grovelling on my knees and hoping some of you hadn't yet deleted my blog from your favourites.

You know it's been a little too long when it takes you three tries to remember your password!

Truth is I'm ALWAYS busy with crafts, and really the quieter I am means that my business of sewing and selling is going well so you have to be happy for me really non? 

Well I AM getting back to blogging, but for a while my pics will totally be cell phone pics until we get a new Camera worthy of you guys.

So can we strike a deal, if you can pretend there were no others then I won't ask any questions like were they better than me? funnier? (gulps) craftier?

Ruby
x

Monday, September 8, 2014

Recycled Dolls House Kitchen Appliances

DSCF6703
 
Earlier in the year I shared the  Dolls House reveal, the renovated Dolls house for my little ladies 2nd birthday. The idea was to use recycled materials where possible, and I'm pretty chuffed (UK slang for happy/impressed) with the finished rooms.

Before (house furthest away)

482331_10151549914652526_1815972014_n (2)

A sneaky peak at the after


I fully intended to make all the furniture until it dawned on me that whilst I can boast some skills with Fabric, despite coming from a family of very talented Joiners, anything to do with woodworking and I am a complete idiot. Honestly at Woodworking classes as a teen I was so scared of the high speed sanding machine I waited until the end of class for the teacher to do mine.

 It's not so much that I'm scared of power tools, I'm just really, really, really clumsy and I know my limits. Yup call me a big girls blouse if you will, but I'll take your simple sand paper sheets over those high speed, whirring discs of death any day.

So I was certain that I needed the furniture to be made of wood but waiting for my lovely hubby to cut some for me was proving frustrating to say the least.

You know the joke "Ladies, if a man says he's going to do something, there's no need to remind him every 6 months" totally my husband, and to be honest we have a property that is knee deep in renovations so I get his reluctance to cut me some wood furniture.

Cue a very handy Garage sale buy, a bag of Wooden kids building blocks, plain sanded wood in useable cube shapes. $2 later, some Acrylic paint and I have all I need to get cracking.

I started with the oven, the backs of Safety eyes was perfect for the burner rings, add some Mod Podge dimensional medium over a metallic pen and I had something resembling a Cooker!

DSCF6710

The dishwasher was even easier, a few dots for buttons and a line with a black sharpie worked wonders for the door. Anything that I wanted to appear 3D I added a drop of the dimensional gel and it dried glossy, with the 3 Dimensional look I was going for.

DSCF6708

I don't profess to be a talented painter, but what the heck, they were fun to make and they passed muster with the little lady, too big for her to eat and heavy enough for her not to break! winner winner Chicken dinner!

Sunday, August 31, 2014

Grannys no Square - Crochet Blanket


So I kinda just helped myself to a big ole blog break over the Summer, a sneaky trip back to Blighty to catch up with the folks and soak up some of the amazing history, style and culture of my homeland was just what I needed, the kids got to meet all of our family members and get a taste of a real British Summer, which surprisingly was actually sunny, for two whole week!.

It wasn't until I came back from England that I pulled myself together and vowed to finish the mountain of half finished, half started, nearly finished projects I have languishing in my crafty space. This blanket was the first contender. A generous donation from my husbands work colleague, thank you Heather! of a ton of white cotton was just what I needed to unify the colours and spruce up the blanket.

Relaxed and fully recharged I'm raring to get started on sharing all my new projects with you lovely people.


So this project I've had in the works for erm (shuffles feet) about 2 years, yup I raced through the Granny squares then hit a design wall. I wasn't even sure if the Purple, Neon Green, Aqua colour scheme was even going to work. In fact, on reading this, I'm still not sure it does work on paper! oh well!


This blanket started the way most of my blankets start, what yarn do I have in the same gauge and fibre content?, I had a bit of Cotton kicking around so I basically threw it all together. I know, I make it sound so haphazard but I really love to be surprised by the outcome.


Crochet tutorial: joining granny squares 1

I used a new joining method thanks to this awesome tutorial from Carinas craft blog which I really enjoyed, it uses the same stitches as the Granny square itself and because of the spacing, a 35 block granny square blanket ended up a generous twin size instead of a lap quilt! (The bed in the pic is a Queen)

Just for fun, here is the funny, sunny little lady, Gabrielle my muse for all things bright, colourful and cute <3


So much more to share, I'm back to blogging and it feels great!

Tuesday, July 1, 2014

Drape Drape 2 - Book Review


DSCF6724

 
Alternative title for this post (and my personal favourite) Drape Drape 2 - Electric Boogaloo! Not quite as informative but equally entertaining.

Okayyyy back to business, so  I've been sewing, A LOT recently, and pushing myself to try new things. That's the beauty of Me Made May (glut of posts in the pipelines still) you get caught up in the creative spirit and this year it led me to draped patterns

Pinning one evening led me to Drape Drape, a series of 3 Japanese pattern books by Hisako Sato. The premise of the first book is to produce draped clothing with one piece of fabric using tucks, slack, gather, twist and draping of fabric.

Flicking through the book there is the usual Artsy Fartsy Japanese photographs of trouserless bored looking models staring at each other, looking like they weren't paid enough and displaying the look you have when you run upstairs and then forget what you went up there for, to then remember the moment you got downstairs, you know the look ;)

Photography aside, what really sells the book is, as expected, the designs. So intriguing that you want to trace, cut and sew immediately just to see how the pattern works. 

Not simply interesting, at least 10 of the 14 patterns are actually WEARABLE, by REAL people, with JOBS and LIVES!. Of the 4 that I would not wear myself, the designs are still attractive, but simply more avant garde than a 36 yr old mama of 2 can get away with on the school run, without being mistaking for someone stuck in a discarded parachute in a freak accident... but perhaps you like that look!

DSCF6726

My photos show No. 2 One piece side drape top, the pattern was fun to sew, just one pattern piece produced a stylish draped garment.
I like the easy comfortable fit and it worked exactly as the instructions suggested.
I was nervous about straight stitching the binding on the neckline
but I did what the book said and lo and behold no problems.

DSCF6721

Cons of sewn pattern?

The pattern was truly problem free, the instructions are basic but elsewhere in the book additional info on hemming and binding necklines is all you need to successfully finish the garment.

Would I sew this again?

Absolutely I would attach the binding facing outwards to match the neckline but no other changes would be made, this is just my style preference.

Tips: Go slow on the neckline top stitching, the finishing touches are ALWAYS worth taking extra time over.

 Reviewing the whole book a few more cons arose, overall I loved it and would purchase and recommend it to others, it's reasonably priced and far cheaper than trying to track 14 draped patterns, it will flex your sewing muscles and provide some serious wardrobe candy.

Downsides of the patterns

Many lines, few pages:
 
14 intricate patterns, on 4 sides of paper, in the same colour ink, you do the math. Tracing the patterns is likely to give you a headache. With more lines than a Hollywood blockbuster you'll need good light, very transparent paper and a can-do attitude to get the job done properly.

Pattern sizes:

If you're touchy about your dress sizing this is not the book for you, as a UK 8 (US 4) I expected to be a Medium since it's a Japanese book. Alas no, I am an XL, the largest size in the book. Presumably XS is for unborn foetus or miniature breeds of puppies?

Summary:
* Available in English translation
* Interesting wearable designs you will be dying to sew.
* Intermediate/Advanced level sewing
* Great intro to draping


So check it out, loan it through your library like I did or treat yourself to a copy, through Amazon for a pretty sweet price


Note: No remuneration has been received by the Author, Publisher for this post, it's all my own opinion. The Amazon link is for your viewing pleasure only and not an affiliate link.

Sunday, May 25, 2014

Refashion: Plain Gingham to Embroidered Loveliness


At the last Value Village sale I picked up a cute but very plain little Gingham dress for $2.50 for my little lady and just knew exactly what it needed, don't you love those simple refashions where you just know at first sight?


 Now my little one is a bit of a tomboy so it's a struggle to get her into anything without trouser legs, short of rolling her in a blanket and sitting on her. I showed this off to her the next day and she ASKED ME if she could try it on, and (gulp) she even wore it for half a day, yes it even lasted through two meal times which is an all time record. I failed to get a non blurry photo of her, (usual story) but the fact she wore it and loved it is a winner for me.

It was a quick turn around for this refashion, I know the stitching looks complicated to the untrained eye but it's nothing more than a handful of stitches. Running stitch, cross stitch and an easy peasy woven stitch. Yep super simple but it looks so fancy and adds a little vintage flavour to a plain expanse of Gingham.
 
If you're wondering what this kind of embroidery is it's called any of these names Chickenscratch/Broderie Suisse/Snowflaking and I absolutely love it. From afar the stitching looks like Smocking but it can be applied to a finished dress unlike Smocking which has to be completed first.
 
 
Want to see more of my attempts at Chicken Scratch? 
 check here for links to tutorials and here for more.


Anyone else notice that I did the stitching on the back of the dress? Good job it won't take me too long to do the same on the front too!
Related Posts Plugin for WordPress, Blogger...
01 09 10